From Queens to Mexico City, and pretty much nothing in between.

Friday, March 25, 2011

Tres Leches, à la mom


I grew up on Hungry Jack mashed potatoes, Gravy Master and Minute Rice, a culinary childhood that I would not change for anything. Accordingly, for the first twenty-two years of my life, birthdays were celebrated with my mom's gourmet box mix cakes and canned frosting. (Funfetti was always my personal favorite - so festive! - I'm no food snob.) Unfortunately, box mixes are developed to be very moist and do not hold up well bathed in tres leches.

I am my mother's daughter, and I, too, am uninterested in the hassle and expense of baking a cake from scratch - and I'm sure that many others feel the same way. This doesn't mean that we don't deserve to "make" and enjoy tres leches cakes ourselves. With that in mind, I did some experimenting to come up with this lazy tres leches cake (for the rest of us).

(This particular recipe is in cupcake form - my mom's favorite style of cake, but can be made in any cake form. Admittedly, the moistness of the tres leches cake does not lend itself particularly easily to handheld food.)

Ingredients
1 box (500g) yellow cake mix
3 eggs
1/3 cup water
1/3 cup vegetable oil
1 can (14-oz) sweetened condensed milk
1 can (12-0z) evaporated milk
1 cup half and half
1 can vanilla frosting
optional topping (fruit, sprinkles, nuts)

Directions

1 - Preheat oven to 350*.

2 - In a large bowl, mix the cake mix, eggs, water and vegetable oil.

3 - Fill your cupcake pan with paper liners.

4 - Fill each cup about 2/3 of the way full (with about a 1/4 cup of cake batter).

5 - Bake for 20 to 25 minutes, or until a toothpick comes out clean.

6 - While the cake is baking, mix the condensed milk, evaporated milk, and the half and half (our tres leches) together.

7 - When the cupcakes come out of the oven, poke holes into the top with a toothpick.

8 - Immediately spoon the milk mixture onto the cupcakes until there is no milk left.

9 - Put the cupcakes in the refrigerator for at least 30 minutes while the cake soaks up the milk mixture.

10 - Soften the frosting by leaving it in a warm area for at least 30 minutes. (Hard frosting will tear at the cake.)

11 - Frost the cupcakes and top with sprinkles or crushed pecans (or strawberries or peaches, if you must).

Wednesday, March 23, 2011

Tres Leches - The Official Cake of Mexico

tres leches cake

Having a pastry chef for a boyfriend has certain advantages. Besides a protective layer of blubber to keep warm in the winter, the dessert table for every holiday and special occasion is always well-catered (like that delicious, dense, heart-shaped chocolate cake that I've devoured four years in a row on Valentine's Day). And with a Mexican pastry chef, that also means a tres leches cake for every birthday celebration in my family - despite their slight gringo resistance to its wetness.

Tres leches means three milks, and it is the standard cake for birthday celebrations in Mexico (and throughout much of Latin America). The cake is soaked in a mixture of sweetened condensed milk, evaporated milk and half-and-half (the tres leches) to create a sweet, moist (but not mushy) delicacy. Since it's Mexico, bakers tend to corrupt this delicious cake with some sort of fruit, usually strawberries or peaches (but you will not find that type of recipe here...ever).

Ingredients
Cake

4 eggs
1 egg yolk
120 g sugar
100 g flour
20 g cocoa powder
20 g melted butter
pinch of salt
Soaking Mixture
1 can (14 oz.) Lechera sweetened, condensed milk
1 can (12 oz.) Carnation evaporated milk
1 cup half-and-half
Frosting
2 cups heavy cream
1 tsp. vanilla extract or powder
1 Tbsp. sugar

Directions

1 - Preheat oven to 325* F.

2 - Put the eggs and sugar in a bowl and place over a bain marie (a metal bowl over a pot of warm water at the point of simmering).

3 - Beat the eggs and sugar together until warm, a light color and double in volume. Then, remove from the heat and continue to whisk until the mixture cools.

4 - Fold in the flour, cocoa powder and salt. Then, add the butter.

5 - Pour mixture into 2 greased and floured 8-inch round cake pans. Bake for about 20 to 25 minutes or until a toothpick comes out clean.

6 - While baking the cake, mix together the sweetened condensed milk, evaporated milk and half-and-half. Keep in the fridge.

7 - When cakes are done, remove them from their pans and place them on a sheet pan. Slice the rounded top off of one of the cakes.

8 - Alternately brush each cake with the tres leches mixture until there is none left. Rest the cakes at least 15 minutes in the freezer or 30 minutes in the refrigerator.

9 - While the cake is in the refrigerator soaking up all the milk, whisk the heavy cream. Add the vanilla and sugar and continue to whisk to a spreadable (or pipe-able) consistency.

10 - Frost the top part of the bottom cake and place the other cake on top. Frost the top and sides of the cake.

11 - Decorate with swirlies if you're feeling fancy. Store the cake in the refrigerator.

Monday, March 21, 2011

Mañanitas

mananitas
Estas son las mañanitas (These are the "mañanitas")
Que cantaba el Rey David (That were sung by King David)
Hoy por ser tus cumpleaños (Today, since it's your birthday)
Te las contamos a ti. (We will sing them to you.)

Despierta, Maggie, despierta (Wake up, Maggie, wake up)
Mira que ya amenecio (Look the sun's already rising)
Ya los pajarillos cantan (The birds already singing)
La luna ya se metio (The moon has gone.)

Despite what you may (or I may, as well) have learned in your 7th grade Spanish course, Feliz Cumpleaños a Ti sung to the tune of "Happy Birthday" is not Mexico's primary birthday song. Instead, they have the tradition of mañanitas, which is not just the little song above (which actually has several more verses), but also an event. Originally, at dawn on a person's birthday, family and friends would gather outside of their window and wake them up with this song. Afterwards, the guest singers would get invited in for, at the very least, coffee, and usually breakfast (which, ideally, is made by someone else in the household, not the birthday celebrator).

Fortunately, at some point in the past 50 years, with urban migration and less of an agrarian society that wakes up at dawn (I'm guessing), someone realized that waking a person up with the sun with loud, off-key singing and a large group of people mooching their breakfast did not seem like a good birthday present. Now, the mañanitas squad comes around midnight, in the first minutes of a person's birthday. While the second verse of the song no longer makes any sense, at least you don't have to entertain at 5 a.m. - you still are supposed to feed them though, lousy moochers.

Today we are celebrating the birthday of the only, universally beloved person in Mexican history - Benito Juarez! (Tomorrow, just as important - me!)

Sunday, March 20, 2011

Chiles Rellenos (in Photos)

A fresh jalapeño

chiles rellenos
cut with the shape of an "I"

chiles rellenos
with all its seeds removed

chiles rellenos
and boiled until it turns a light green

chiles rellenos
stuffed with delicious filling

chiles rellenos
with the chile "doors" closed

chiles rellenos
rolled in flour

chiles rellenos
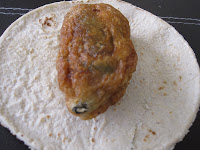
fried in batter and served on a tortilla

chiles rellenos

Friday, March 18, 2011

Chiles Rellenos (Part 2)

chiles rellenos
While this type of chile relleno still comes from a Mexican culinary tradition, I tend to associate them more with the United States. The poblano chile is milder and more tolerable for the sensitive gringo tongue, the concept of melted cheese is comforting and familiar, and they serve them up in the "create your own combo" meal at On the Border locations across the country. Despite my American association with these chilies, these are actually the more common form of the chile relleno throughout Mexico. (Shows what I know.)

Sadly, these chiles rellenos are just as daunting and time-consuming to make as the other ones - in fact, even more so. Poblanos have to be charred, not just boiled. They're bigger and, therefore, more cumbersome to fry. They also require a plate and utensils (very upscale) and are nearly always served with rice and never in my favorite on-the-go, in-a-tortilla style. That said, there are very few things in this world that taste better than the combination of a charred poblano chile and melted cheese.

Ingredients
10 poblanos
1 lb. melting cheese (queso de hebra, queso asadero or monterrey jack)
1 cup flour
5 eggs, separated
1/2 tsp. salt

Directions

1 - Char the poblanos on a comal or over an open flame, moving occasionally until black on all sides. Place in a bowl and immediately cover with plastic for about 10 minutes. Remove the charred skin and allow to cool.

2 - Wearing gloves, cut the letter "I" into the jalapeños. Gently open them and scoop out all the seeds and veins with a teaspoon. Be sure not to rip the chile!

3 - Begin cramming them with the cheese. Be sure that the chile "doors" still close, while still stuffing it with as much as you can. (If the chiles are falling apart or the doors are falling off, you can mend them with a toothpick.)

4 - Roll the chiles in flour.

5 - In a large bowl, whisk the egg whites to a stiff peak. Add the salt. Whisk in the egg yolks. (Throughout the following frying process, keep the batter well whisked between batches.)

6 - In a large saute pan, heat about an inch of oil.

7 - Once the oil is hot (and be sure because you don't want soggy chiles), use a spatula to dip a floured chile into the batter and remove the battered chile to the pan of oil.

8 - Fry for 1 to 2 minutes on each side. Remove to a paper towel to drain.

9 - Serve the chiles warm over some red rice (the kind with tomatoes) and corn tortillas. Enjoy!

Wednesday, March 16, 2011

Chiles Rellenos (Part 1)

chiles rellenos
After nearly two months of this blogging experiment, I find that I have no idea what to write about chiles rellenos. What can be written? That they are the best possible use for that all-purpose filling? That they are the perfect combination of spicy jalapeños, sweet veggies, flavorful meat (or creamy white cheese) and fried batter? That we make a hundred at a time, eat them all week for lunch and dinner, and still want more? That all work and no chiles rellenos makes Maggie a dull girl?

Chiles rellenos are fabulous, but like all the best things (especially in Mexican cuisine) are a bit of a hassle to make. I was trained in the art of chile relleno making by my mother-in-law, who made and sold her chiles professional as a one-woman business. Still, I am not nearly as skilled or seasoned and find the process to be a multiple-day, multiple-man job. These days, they're often served with rice, but I like them best simply wrapped in a warm corn tortilla like a taco (alla Veracruzana - great for someone who doesn't want to wash plates or utensils.)

Ingredients
25 jalapeños
3 Tbsp. plus a pinch of salt
1 qt. filling (chicken or cheese or picadillo, etc...)
1 cup flour
5 eggs, separated
oil, for frying

Directions

1 - Wearing gloves, cut the letter "I" into the jalapeños. Gently open them and scoop out all the seeds and veins with a teaspoon. Be sure not to rip the chile!

2 - In a large pot over high heat, boil the chiles with 3 tablespoons of salt until they turn a lighter green, about 25 minutes. (This step can be repeated to remove more heat from the chiles, if that's what you want for some reason, but be careful not to overcook or you will have a smushy, light green mess!)

3 - Drain chiles, allow to cool and begin cramming them with the filling of your choice. Be sure that the chile "doors" still close, while still stuffing it with as much as you can. (If the chiles are falling apart or the doors are falling off, you can mend them with a toothpick.)

4 - Roll the chiles in flour.

5 - In a large bowl, whisk the egg whites to a stiff peak. Add a pinch of salt. Whisk in the egg yolks. (Throughout the following frying process, keep the batter well whisked between batches.)

6 - In a large saute pan, heat about an inch of oil.

7 - Once the oil is hot (and be sure because you don't want soggy chiles), use a spatula to dip a floured chile into the batter and remove the battered chile to the pan of oil.

8 - Fry for 1 to 2 minutes on each side. Remove to a paper towel to drain.

9 - Remove the stem (and eat the batter off the stem, but NOT the entire stem - I learned that the embarrassing way), wrap the chile in a corn tortilla and chow down!

Monday, March 14, 2011

More Than A Filling...

tinga
Mexican cuisine is full of fillings - for tamales and burritos, chiles and empanadas, to name a few. Two of the most popular meat fillings (because we all know that cheese is the absolute favorite) are tinga and picadillo, but this recipe is not really either. However, our filling is similar; it's like picadillo, but without the sweetness of raisins and cinnamon and like tinga without the chipotle. Like those two fillings, this one can also be made with any kind of meat.

The best quality of this filling (besides great flavor, if I may boast a bit) is the cost, because it stretches a small quantity of expensive meat with lots of cheap vegetables. The other best part is that it inserts some much needed veggies into a cuisine that's not exactly bursting with them. And the other best element is its versatility - going great stuffed into all the dishes mentioned above, as well as simply topping tostadas or a scoop of rice. (OK, so it doesn't make sense to have three different best things, but I really love this filling!)

Ingredients
1 lb. shredded chicken
1 roma tomato, diced
1/2 large onion, diced
2 cloves garlic, minced
2 carrots, diced
2 white, waxy potatoes, diced
1/2 cup peas
1 Tbsp. garlic powder
1 tsp. thyme
3 bay leafs
1/2 cup tomato sauce
salt and pepper to taste
oil, for frying

Directions

1 - Boil the potatoes and carrots until cooked, tender, but not smushy, about 15 minutes. Set aside.

2 - Boil the peas (if fresh) about 5 to 10 minutes. Set aside.

3 - Coat a large saute pan with oil and place over medium-low heat.

4 - Add onions and saute until soft and translucent, about 10 to 15 minutes.

5 - Add the garlic, potatoes and carrots. Cook for 5 minutes, stirring occasionally.

6 - Add the tomatoes and shredded chickens, and cook together for 5 more minutes.

7 - Add the peas, garlic powder, thyme, bay leaf, tomato sauce, salt and pepper.

8 - Add about a half cup of water. Lower the heat, and continue to cook mixture for another 15 to 20 minutes, stirring occasionally.

9 - Dig in right away or save for stuffing. (See next post for more details.)

Friday, March 11, 2011

Mexico - Online and In the US


I live in Mexico City, and, though I can not for the life of me find a pierogie or a gyro, finding Mexican food and ingredients is literally as easy as walking out the front door, where I am immediately greeted (and tempted) by tacos, tortas, a paleteria, the tianguis (market) and two giant supermarkets. In this, I am very fortunate.

However, my life in Mexico is a relatively new situation, and I expect that my exile will not last forever (though I have no faith that the return process will be quick and painless). When I do return home, I know that I will miss the year-round temperate weather, but I will not have to miss any of my Mexican favorites. Obviously, these days, supermarkets have plenty of Mexican necessities - tortillas, chiles and the like. For the more obscure items, or to refill my sister's Damy stash, I have always been very grateful for mexgrocer.com for its massive selection and reasonable prices. I recommend it to any Mexican-food loving gringo, and I look forward to using it myself (and eating pierogies and gyros) again one day.

Wednesday, March 9, 2011

Plantains - a "Good Fruit"

plantains
I know, I know that I ranted a little bit last week about my distaste for Mexico's general "fruit for dessert" philosophy, but now I have to eat my words and make an exception. I love plantains for dessert (and breakfast, too), but only on the condition that they're drowned in lots of cream and sugar - just like how I take my coffee.

Plantains are a truly quintessential Latin ingredient, from Cuba to Colombia, fried crisp to be chips, served with beans, completing a bandeja, boiled into a drink. Those countries on the Caribbean can (and do) do anything with a platano. The important thing to remember about working with plantains is that they have to be at the right stage for each recipe. This particular one requires a plantain beyond ripe, very soft, with a blackening peel, and that's about only five minutes away from being rotten. (As grossed out as you may be by their appearance and the fruit flies buzzing around, do not throw them out yet! They really are at their best!)

Ingredients
4 macho plantains
1 cup (250 g) media crema
1 cup sugar
oil for frying

Directions

1 - Prepare the plantains. Not only should the peels be black, but the plantain inside has to be soft (nearly smushy). If it isn't, squeeze the plantain while still inside the peel to soften it.

2 - Unpeel and cut in half lengthwise and then in half otherwise to make 4 finger like pieces per plantain (or leave them whole or cut in medallions, however you like, really).

3 - Over medium heat in a large pan, heat about a centimeter of oil.

4 - Carefully (!!) place the plantains in the oil and lower the heat.

5 - Cook the plantains for about 7 to 10 minutes on each side.

6 - Remove with a slotted spoon or spatula so that excess oil can drip off. (Do NOT drain on a paper towel - it will be a sticky mess and you will wind up eating quite a bit of that paper towel.)

7 - Serve warm topped with cream and sprinkled with sugar.

Monday, March 7, 2011

Oh, Mama! Empanada!

empanadas
When I lived in Queens, our standard takeout wasn't pizza (too expensive) or Chinese food (the buffet is better), but empanadas! Papa's Empanadas, or Mama's Empanadas (same menu, same cute cartoon empanada, same owners, I imagine), serve up Colombian-style empanadas at the very low price (especially in New York) of $1 - $2 each one. They offer both wheat and corn based shells with traditional fillings (like cheese or shredded beef), as well as those that are more reminiscent of a Hot Pocket (like broccoli and cheese or pepperoni pizza).

Oh, great, now my keyboard is splattered with nostalgic drool...and I think some tears, too.

Here in Mexico, I still enjoy empanadas pretty frequently, although it requires a little more effort than making a phone call. (If it didn't, I would be eating some right now!) Empanadas (or quesadillas as they're called in Mexico City, despite the fact that they don't necessarily have queso) are made exclusively of corn flour masa, filled with a variety of stuffings, fried and served with salsa, lettuce and sour cream. Chicken and cheese fillings are most common in Mexico, but mushrooms are quite popular in the DF, and a chorizo and onion filling is quite popular in my home. As with everything in this world, cheese is the best.

Ingredients
masa (store bought or homemade - see masa post)
oil, for frying
shredded lettuce
salsa verde
sour cream
possible fillings -
shredded chicken
chorizo and onion
good melting cheese (queso asadero or queso de hebra or monterrey
jack - whatever you can find)

Directions

1 - After making (or buying) the masa, divide it into meatball-sized and -shaped pieces. Flatten them between 2 sheets of plastic (a cut up Ziploc bag) into rounds with a thickness of 1/8 inch.

2 - On one half of the dough, put about 2 Tbsps. of your chosen filling, leaving a 1 cm. edge. Using the plastic, fold the other half over the filling and seal the edges.

3 - Fill a deep pan with at least one inch of oil. Heat the oil over medium heat.

4 - Very carefully (!!), slide the empanadas into the oil and fry for about 3-4 minutes.

5 - Remove with a spatula and drain on a paper towel.

6 - Serve with salsa for dipping (Papa's Empanadas Style) or covered with salsa verde, lettuce and sour cream.

Friday, March 4, 2011

Maizena Atole Mixes


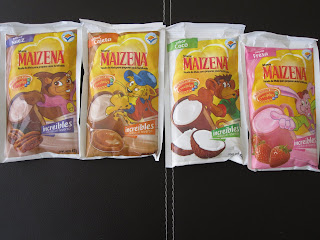
Vanilla and chocolate are delicious and easy enough to make, but sometimes you want to mix it up - without making any extra effort. (Because, really, who ever wants to make more effort?) Thankfully, Maizena (as well as some of the supermarket brands) makes powdered mixes with cute little cartoons on them that are cheap (3 pesos in Mexico, 85 cents in the U.S.), as easy to make as regular atole and readily available in any Mexican supermarket or online.

Maizena offers a variety of basic, as well as some special, flavors. There's vanilla and chocolate, of course, in the rare case you don't have vanilla extract or cocoa powder in your house (but if you do, make your own). For people who enjoy fruit (because I'm sure there's at least a few out there), there's strawberry, coconut and guava, all of which taste best in the near frozen "milkshake" style. The other flavors, pecan and cajeta (dulce de leche), taste great either hot or cold (or chilled and thrown into the ice cream maker)!

Wednesday, March 2, 2011

Atole (x3)

atole
After making the alfajores, I was stuck with a giant box of Maizena, and I had no idea what to do with it (and I'm not currently plagued by diaper rash, diarrhea or chicken pox, so that rules out use as a home cure). So I decided to take the advice on the side of the box and make atole. (I also made fleur de lait, but that's even less Mexican than I am.)

Atole is a hot Mexican drink from ancient times made from milk and corn starch (or ground corn, originally). The cornstarch makes the drink slightly thicker than milk and the plain version tastes an awful lot like sweet grits. The traditional atole lends itself to many variations, among them, piloncillo, chocolate, vanilla and various fruits. These days, freezing and blending atole drinks is very popular, making a sort of corny, ice cream-less milkshake. Atole is common drunk to celebrate holidays, like Día de los Muertos and Las Posadas before Christmas, but it's just as commonly drunk to celebrate waking up in the morning or finishing dinner, as breakfast and dessert.

Ingredients
1 qt. whole milk
3 Tbsp. cornstarch (Maizena)
1/4 c. sugar

3 Tbsp. cocoa powder (for chocolate variation)
or
1 1/2 Tbsp. vanilla extract or powder (for vanilla variation)

Directions

1 - Dissolve the cornstarch in 1 cup of the whole milk. Set aside.

2 - Bring the remaining milk to a boil in a large pot over medium heat.

3 - Add the milk-cornstarch mixture to the boiling milk. Return to a boil and stir constantly for at least 2 minutes, or until the atole thickens.

4 - Take off heat. Add sugar and stir until it dissolves.

5 (optional) - Add cocoa powder or vanilla to flavor the drink as desired.