From Queens to Mexico City, and pretty much nothing in between.
Thursday, January 26, 2012
Tuesday, January 24, 2012
Tamales Oaxaqueños
 Once while working at a bakery, I brought in some leftover tamales to share with my overnight crew. What I thought was a nice gesture turned quickly into a heated debate of people from various Latin American countries over whether an authentic Mexican tamal is made inside a plantain leaf or a corn husk. The arguments were impassioned, but, much to my dismay, everyone got to be right.
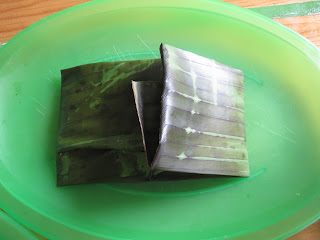
The tamales that I first ate, usually eat, and usually make (and those on my side of the argument) are made in plantain leaves and are known as tamales oaxaqueños. This variety is most common in southern Mexico (Veracruz, Oaxaca, Chiapas, etc.) For some reason, certain varieties of tamales generally go with one of the wrappers or the other. While salsa verde or sweet tamales get a corn husk wrapper, frijol fillings or those with salsa roja belong to the tamales oaxaqueños variety (and I've seen picadillo in both).
Ingredients
1 package of plantain leaves
1 pacakge (or 900 g) Maseca masa for tamales
400 g lard, melted
2 - 3 L chicken stock (or water)
2 Tbsp. salt
400 g lard, melted
2 - 3 L chicken stock (or water)
2 Tbsp. salt
1 liter salsa roja
1 whole chicken
Directions
1 - Cut the raw chicken into 1-inch pieces (wings - 2 pieces each, legs - 3 pieces each, thighs - 4 pieces each, breast - 8 pieces each, at least).
2 - Prepare the plantain leaves. If they are whole leaves, cut them into about 8x10 inch squares. Pass each leaf piece over an open flame for about 20 seconds on each side. (This should make them pliable, but they should not get any color.)
3 - In a very, very large bowl (5 L capacity, at least), mix the Maseca, half of the chicken stock, and salt together. Then, add the lard and mix well. Slowly add more stock until you reach a creamy consistency. When you remove your spoon (or hand, as we do it), the mixture should run off back into the bowl.
4 - Fill the bottom part of your tamale pot (steamer) with water, and put it over high heat.5 - Set up a tamale assembly line in the following order: leaves, masa, salsa, chicken.
6 - Put a small scoop of masa in the middle of the plantain leaf. Put a scoop of salsa on top of the masa, and place a piece of chicken on top.
7 - Fold in the short sides of the leaf first; then the long sides.
8 - Once wrapped well, start placing the tamales in the tamale pot.
9 - Repeat steps 5 through 7 until there are no ingredients left. (I usually run out of chicken first, but I always have some frozen chicken nuggets on hand, which is actually quite a crowd pleaser, especially for little gringo children. Cheese works, too - most anything not to waste delicious masa.)
10 - Put the lid on the tamale pot, and cook for an additional hour and 15 minutes.
11 - Remove and serve tamales with tongs.
12 - Unwrap and enjoy! (Careful, they will be hot!)
Thursday, January 19, 2012
Tamales
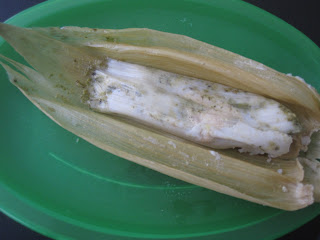
American is to apple pie as Mexican is to ___________. The answer: tamales. The tamal (which is the singular in Spanish, not tamale) has been popular throughout Mexico and Central America since pre-hispanic times, and there are probably hundreds of different varieties - different salsas; different leaf or husk wrappers; different meats; no meat, just beans; no meat, just fruit; etc., etc., etc. However, all varieties of tamales seem to have two required ingredients - tamale masa (generally bought in the supermarket as Maseca's masa for tamales and readily available in the US) and manteca (lard).
 Though not very expensive, in Mexico, tamales are generally reserved for special occasions, birthdays, holidays and the like, which I imagine is due to the procedure and time that tamales warrant. Besides the homemade ones for special occasions, tamales are very popular street food and are often served up in a bolillo to make them a handheld snack. Another option here in Mexico City is the "tamale man," whose fleet of tricycles goes around the city, playing their blaring commercial and selling tamales directly at your doorstep (he passes my house at 10:15 every night).
Ingredients
1 package of dried corn husks
1 pacakge (or 900 g) Maseca masa for tamales
400 g lard, melted
2 - 3 L chicken stock or water
2 Tbsp. salt
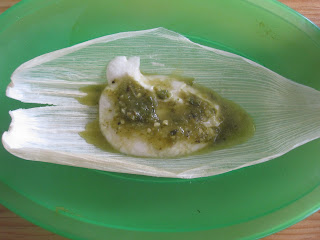
1 liter salsa verde
1 1/2 kilos boneless chicken, cut into 1-inch cubes (about 40 to 50 cubes)
Directions
1 - Prep the dried corn husks. Separate the husks and soak them in a big pot of warm water. Wash and rinse them. Let them dry. Throw any ripped husks away.
2 - In a very, very large bowl (5 L capacity, at least), mix the Maseca, half of the chicken stock, and salt together. Then, add the lard and mix well. Slowly add more stock until you reach a creamy consistency. When you remove your spoon (or hand, as we do it), the mixture should run off back into the bowl.
3 - Fill the bottom part of your tamale pot (steamer) with water, and put it over high heat.
4 - Set up a tamale assembly line in the following order: husks, masa, salsa, chicken.
5 - Put a small scoop of masa in the middle of the corn husk. Put a scoop of salsa on top of the masa, and place a piece of chicken on top.
6 - Fold in all sides of the husk over the masa and chicken. Place it upside down inside another husk for extra security. (I don't think that's very authentic, but we usually make the other type of plantain leaf tamales, so it's OK to be extra sure for beginners.)
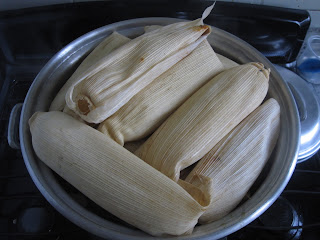
7 - Once wrapped well, start placing the tamales in the tamale pot.
8 - Repeat steps 5 through 7 until there are no ingredients left. (I usually run out of chicken first, but I always have some frozen chicken nuggets on hand, which is actually quite a crowd pleaser, especially for little gringo children. Cheese works, too - most anything not to waste delicious masa.)
9 - Put the lid on the tamale pot, and cook for an additional hour and 15 minutes.
10 - Remove and serve tamales with tongs.
11 - Unwrap and enjoy! (Careful, they will be hot!)
Wednesday, January 11, 2012
Arroz con Leche
Arroz con leche (rice with milk) is exactly as the name advertises and reminiscent of American rice pudding, but with 3 main differences. 1) Arroz con leche has never been served cold to me; it's always been warm, or at the very least room temperature. 2) Arroz con leche is not as custardy as rice pudding because it has no eggs (which, I admit, may not be all arroz con leche recipes, but just a not-so-well-off, money saving adaption). 3) Arroz con leche is the name of a Mexican nursery rhyme, which has nothing to do with the food except that whenever we make it, everyone sings it, and it gets stuck in my head for the next 24 to 48 hours.
Ingredients
1 cup rice
2 cups water
2 large cinnamon sticks
1 liter/quart milk
1 cup sugar
a pinch of salt
Directions
1 - Cook the rice in 2 cups of water with one cinnamon stick over medium-low heat, until all the water is consumed, about 20 minutes.
2 - Add the milk, sugar, other cinnamon stick and salt to the rice mixture.
3 - Cook uncovered for 30 minutes over medium-low heat.
4 - Serve warm (with a sprinkling of ground cinnamon on top, if you like).
In case you're wondering, (and you can google it to get videos if you're really curious)...
Arróz con leche, me quiero casar
Con una señorita de San Nicolás
Que sepa coser, que sepa bordar
Que sepa abrir la puerta para ir a jugar.
Yo soy la viudita del barrio del rey
Me quiero casar y no sé con quién
Con ésta sí, con ésta no
Con esta señorita me caso yo.
Thursday, January 5, 2012
Rosca de Reyes
 As most people's holidays are winding down and we get back to the daily grind of the New Year, here in Mexico (and in many Latin/Catholic countries), there is still one day to look forward to - the Twelfth Day of Christmas, the Epiphany, el Dia de los Reyes. Whatever name you choose, January 6th in Mexico means two (non-Christian) things - presents and bread! (My personal heaven.)
Rosca de Reyes, or the Ring of Kings, is a traditional enriched, sweet bread with candied fruit (think panettone in a ring shape), that is often flavored with anise and orange (just like pan de muerto), although more modern versions may be flavored with chocolate. The bread, besides having all of these delicious flavors baked into it, will also have a baby Jesus doll hidden and baked into it as well. On January 6th, whoever receives the slice with the "muñequito", will be responsible for the food (usually tamales) for the celebration of el Dia de la Candelaria (February 2, or Candlemas, as it is apparently called in English).
Ingredients
1/3 cup milk, warm
1 package of instant yeast
4 large eggs, room temperature, plus 1 for egg wash
1 cup butter, softened
1 Tbsp. vanilla extract
4 cups flour
1 cup sugar, plus 1/4 cup for sprinkling on top
1/2 tsp. salt
2 tsp. cinnamon
1 tsp. anise seeds
2 Tbsp. orange zest
a small porcelain figurine (optional)
assorted candied fruits, cut in strips (red and green fruits are most common, but anything works)
1 egg, for egg wash
1/4 cup sugar, for sprinkling
Directions
1 - In a large bowl, activate the yeast in the warm milk, about 10 to 15 minutes, or until the mixture is bubbly.
2 - Add the eggs, butter and vanilla. Mix well.
3 - In another bowl, mix all of the dry ingredients (flour, sugar, salt, cinnamon, anise seeds, orange zest).
4 - Add the dry ingredients into the wet ingredients, and mix until a dough comes together. Add more flour if necessary.
5 - By hand or by mixer, knead the dough 10 to 20 minutes, or until the dough appears to be smooth.
6 - Put the dough in a greased bowl, cover with plastic, and put in a warm place. Let the dough rise for about an hour.
7 - Fold or punch the dough, return to bowl, and allow to rise for another hour.
8 - Divide the dough into 2 equal parts and roll into long, thin ropes. Twist the 2 ropes of dough around each other and form into a circle. If you have a doll, tuck it in somewhere.
9 - Put dough onto a lined sheet pan, and brush with egg wash. Push the strips of candied fruit into the surface of the bread, alternating colors.
10 - Spray some plastic with oil and put the plastic on top of the bread. Allow to rise for another hour to hour and a half.
11 - Preheat the oven to 350* F.
12 - Brush with egg wash again, and sprinkle with sugar.
13 - Bake for 40 to 50 minutes until lightly golden brown.
14 - Enjoy a slice while giving presents and drinking hot chocolate.
Subscribe to:
Comments (Atom)


